
What That Vinegar Smell in Your Tesla Actually Means
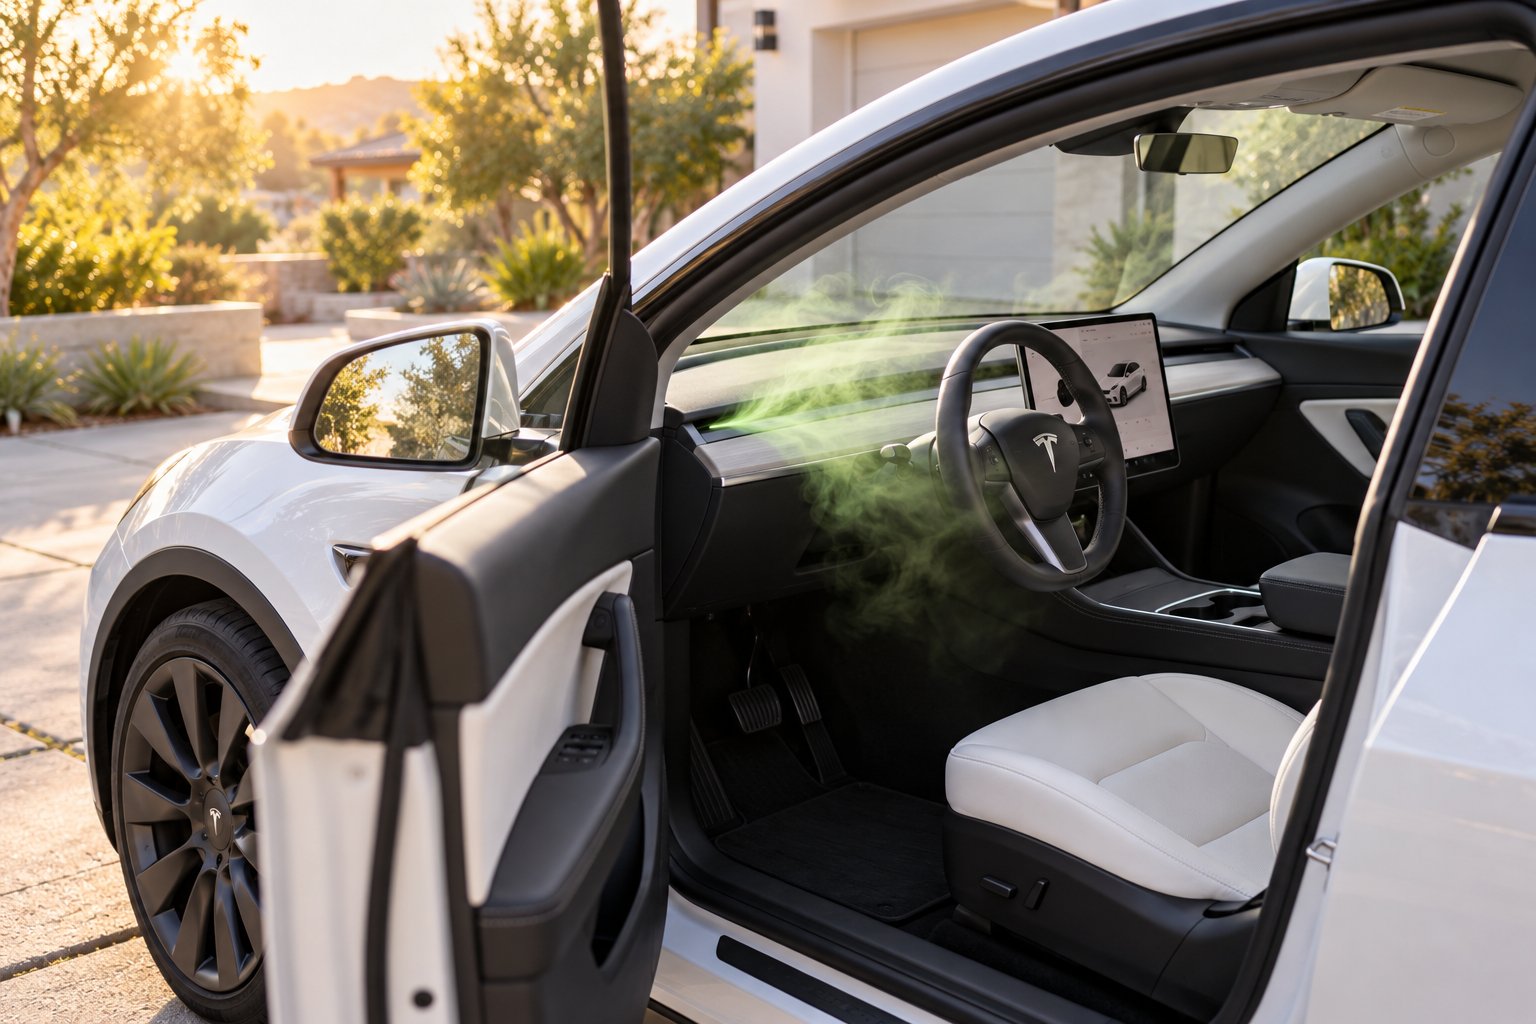
You slide into the driver's seat, tap the climate controls, and within seconds a sour, vinegar-like wave hits your face. Sound familiar? If you've been wondering why does my Tesla smell like vinegar, you're far from alone. It ranks among the most frequently reported complaints across Model 3, Model Y, and even newer Model S and X vehicles. The good news: it is not a sign that something expensive or dangerous has failed inside your car.
That sharp, acidic odor is unsettling, especially in a vehicle with no engine, no exhaust, and no traditional fluids circulating under the hood. Passengers notice it. You start second-guessing every component. But the reality is far less dramatic than the smell suggests, and the path from diagnosis to fix is shorter than you might expect. This guide walks you through the science, the Tesla-specific factors that make the problem worse, and an escalating set of solutions — starting with a free setting change you can try on your very next drive and working up to a professional service visit if needed.
Your Tesla Is Not Broken — But Something Is Growing
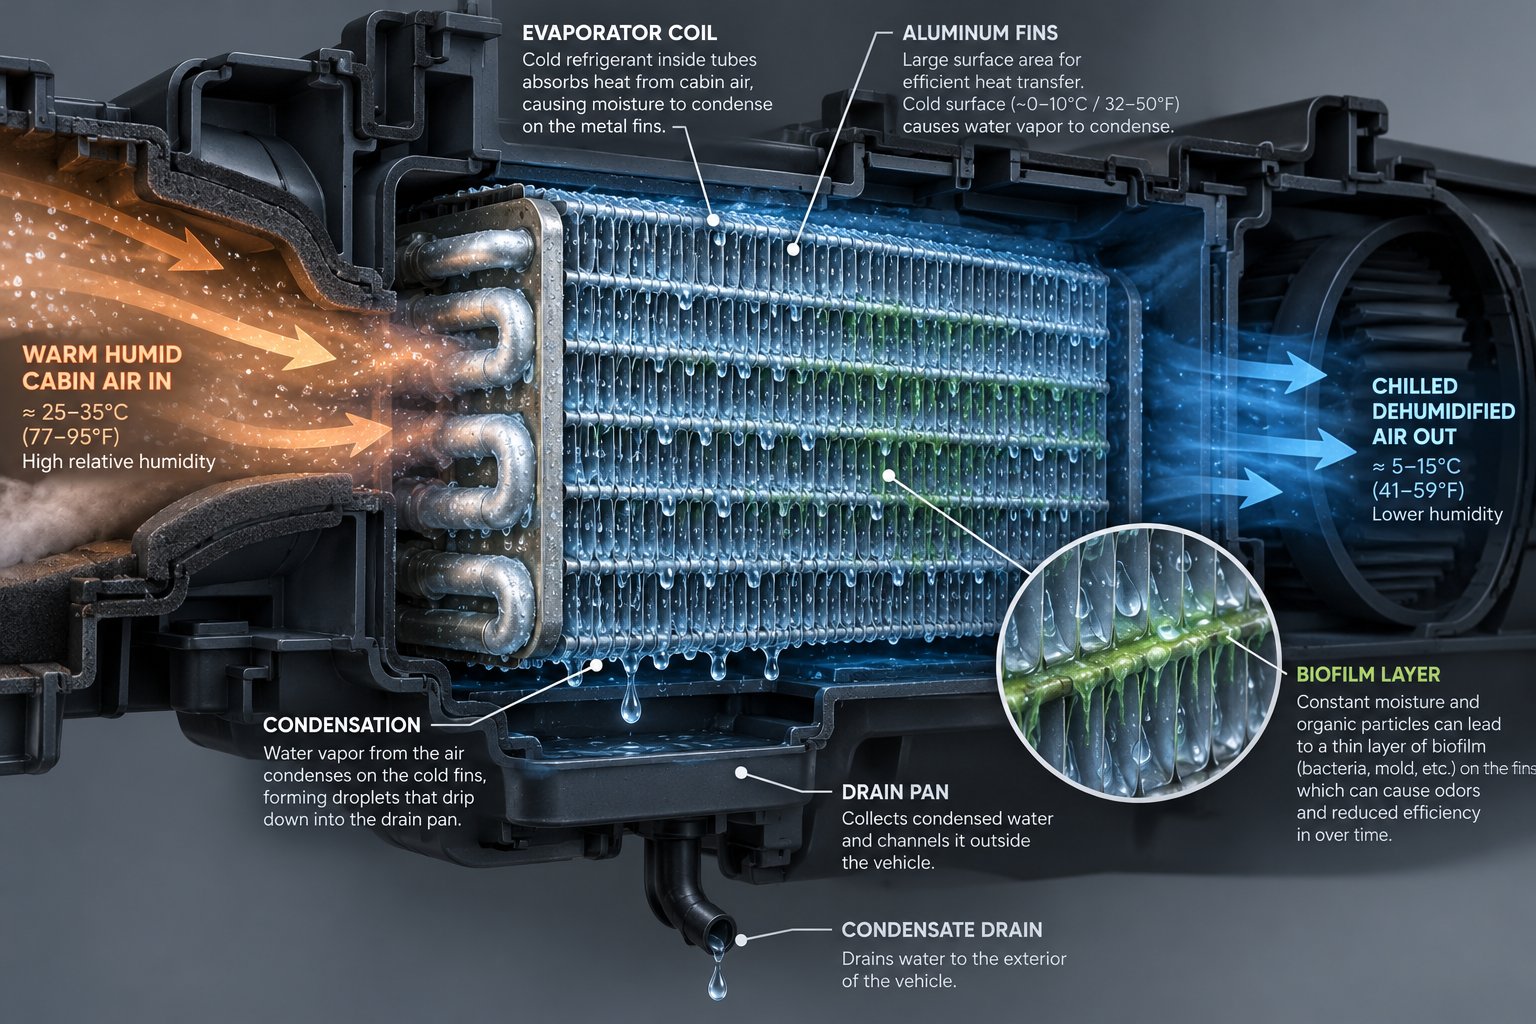
The culprit behind that sour AC odor is biological, not mechanical. Inside your Tesla's HVAC system sits an evaporator coil — a cold metal component that chills incoming air before it reaches the cabin. Every time the air conditioning runs, warm humid air passes over that frigid surface and moisture condenses on it, much like water beading on a cold glass in summer. Under the right conditions, that persistent dampness becomes a breeding ground for bacteria and mildew. The microbial colonies produce byproducts — including compounds that smell distinctly like vinegar — and the blower fan pushes those odors straight into the cabin. The smell tends to be strongest in the first few seconds after the system kicks on, then fades slightly once steady airflow begins drying the coil surface.
This isn't unique to electric vehicles. Any car with an AC evaporator can develop the same issue. But certain Tesla design choices — from its sealed cabin architecture to features like Tesla Smart Preconditioning and Cabin Overheat Protection — can create conditions where moisture lingers longer, giving microbes a head start.
Why EV Diagnostics Are Different from Gas Cars
When a traditional gas-powered car develops an unusual smell, the list of possible causes is long. A failing catalytic converter produces a sulfur or rotten-egg odor. A leaking heater core fills the cabin with a sweet, syrupy coolant scent. Exhaust system corrosion can push fumes inside. Tesla owners can cross every one of those off the list immediately. There is no catalytic converter, no engine coolant heater core, and no exhaust system to worry about.
That dramatically narrows the investigation. A vinegar-like odor in an EV almost always points to the cabin air system — specifically the evaporator coil and the cabin air filter that sits just in front of it. The only notable exception is a rotten-egg smell, which in some Tesla models may indicate a failing 12V lead-acid battery rather than an HVAC issue. But for the classic sour or acidic scent, the diagnosis is straightforward.
A vinegar smell in your Tesla almost always traces back to your HVAC evaporator or cabin air filter — not the battery, motor, or any high-voltage component.
Understanding that distinction is empowering. It means you're not facing a costly drivetrain repair or a safety concern. You're dealing with a maintenance issue that has well-documented solutions — some of which cost nothing at all. The deeper question is what makes the evaporator coil such a hospitable environment for odor-causing organisms in the first place, and why Teslas seem especially prone to the problem.
The Science Behind That Sour AC Odor
That sharp, vinegar-like bite isn't random. It has a precise biological origin — and knowing what's actually happening inside your HVAC system makes it far easier to choose the right fix. The evaporator coil tucked behind your Tesla's dashboard is ground zero, but the type of organism colonizing it determines the exact smell you're dealing with and how aggressively you need to respond.
Bacteria on the Evaporator Coil and Acetic Acid Production
Picture this: every time you run the air conditioning, your Tesla pulls warm, humid cabin air across the evaporator coil's frigid metal fins. The temperature difference causes water vapor to condense on the surface, just like dew forming on grass at dawn. Under normal conditions, that condensation drips into a drain pan and exits through a small drain tube beneath the vehicle. But here's where the trouble starts — if that moisture doesn't fully drain or the coil doesn't dry out between cycles, you've created a dark, damp, consistently cool environment. Bacteria thrive in exactly these conditions.
Species such as Mycobacterium and Pseudomonas are among the most common colonizers of automotive evaporator coils. As these bacteria feed on organic material — dust, pollen, and microscopic debris trapped on the wet surface — they produce volatile organic compounds (VOCs) as metabolic byproducts. One of the most prominent is acetic acid, the same chemical compound that gives household vinegar its distinctive tang. When your blower fan pushes air across a bacterially colonized coil, those acetic acid molecules ride the airstream straight into the cabin.
The process is self-reinforcing. A thin biofilm — a sticky layer of bacterial colonies — forms on the coil surface, trapping additional moisture and organic particles. That biofilm becomes harder to remove over time and produces increasingly concentrated odors. A mild sour note in month one can evolve into an overwhelming vinegar punch by month three if the underlying moisture problem isn't addressed.
Mold vs Mildew vs Bacteria — How to Tell Them Apart
Not every unpleasant HVAC odor points to the same organism, and misidentifying the source can send you down the wrong troubleshooting path. The smell itself is your most reliable initial diagnostic tool. Here's how to read it:
| Odor Type | What It Smells Like | What It Indicates |
|---|---|---|
| Vinegar / Sour | Sharp, acidic, similar to white vinegar or fermenting fruit | Bacterial colonies (e.g., Mycobacterium, Pseudomonas) producing acetic acid on the evaporator coil |
| Musty / Earthy | Damp basement, wet soil, old books | Mold growth, typically on the evaporator coil, inside ductwork, or on a saturated cabin air filter |
| Damp / Stale | Wet towel left in a gym bag, stagnant air | Mildew accumulation, often on filter media or in areas with poor airflow and lingering moisture |
| Rotten Eggs / Sulfur | Strong sulfur odor, like spoiled eggs | Potentially a failing 12V lead-acid battery (in applicable Tesla models) or, rarely, an overcharging condition — not HVAC-related |
If your Tesla produces that unmistakable sour, acidic hit — the one that makes you wrinkle your nose the instant the vents start blowing — bacteria are almost certainly the primary culprit. A musty or earthy undertone layered beneath the sourness suggests mold has joined the party alongside the bacteria, which is common when moisture has been sitting for weeks. The rotten-egg scenario is the outlier worth flagging: it has nothing to do with the HVAC system and warrants a separate inspection of your vehicle's 12V battery.
Why the Smell Is Worst When You First Turn On the AC
You've probably noticed a pattern — the odor hits hardest in the first 10 to 30 seconds after activating climate control, then gradually fades. That timing isn't coincidental. It's a direct consequence of how air and moisture interact inside a dormant HVAC system.
When your Tesla sits parked — overnight in a garage, through a long workday, or even for just a few hours on a humid afternoon — the evaporator coil remains wet from its last cooling cycle. Bacteria on the coil surface continue metabolizing in the dark, producing acetic acid and other VOCs that accumulate in the stagnant air trapped inside the HVAC housing. Think of it as a sealed jar slowly filling with sour vapor.
The moment you turn the system on, the blower fan cracks that jar open. That concentrated pocket of bacterial byproducts and stale condensation moisture gets pushed directly into the cabin in one initial burst. It's the most concentrated dose of odor you'll experience during any drive. As fresh airflow reaches steady state, it begins diluting the accumulated VOCs and slowly drying the coil surface, which is why the smell tapers off after a few minutes — though it may never fully disappear if the bacterial colony is well established.
This "first blast" pattern is actually a useful diagnostic signal. If the vinegar smell is strong at startup but fades within five minutes, you're likely dealing with a moderate bacterial presence that responds well to DIY maintenance. If the odor persists at a consistent intensity throughout the entire drive, the colonization is more advanced, the biofilm is thicker, and more aggressive intervention may be needed.
The biology explains the smell. But biology alone doesn't explain why Tesla owners report this issue more frequently than drivers of many other vehicles. That answer lies in a handful of engineering decisions specific to how Teslas manage airflow, moisture, and cabin sealing.
Why Teslas Are Uniquely Prone to HVAC Odors
Every vehicle with an air conditioning system can develop a sour evaporator smell. So why do Tesla owners seem to report it more often — and more intensely — than drivers of conventional cars or even other EVs? The answer isn't a single flaw. It's a combination of three engineering choices that, individually, serve excellent purposes but collectively create a microclimate inside the HVAC housing where bacteria flourish.
Tesla's Sealed Cabin Design and Reduced Airflow
Imagine sealing a damp sponge inside a Ziploc bag versus leaving it on a kitchen counter. The sealed sponge stays wet far longer because there's nowhere for the moisture to escape. Tesla's cabin architecture works on a similar principle — just at a much larger scale.
Tesla engineers designed every model with exceptionally tight cabin seals. The goal is straightforward: reduce wind noise, improve aerodynamic efficiency, and maximize climate control performance so the HVAC system uses less energy. It works beautifully for those purposes. A Model 3 or Model Y at highway speed is remarkably quiet, partly because very little outside air leaks in around door seals, window gaskets, and panel joints.
The trade-off shows up when the car is parked. In a traditional gas vehicle, small gaps and imperfect seals allow a trickle of passive air exchange — enough to slowly vent humidity from the cabin and HVAC housing. Tesla's tighter tolerances reduce that passive ventilation to almost nothing. Moisture left on the evaporator coil after your last drive sits in a nearly airtight enclosure, and the humidity inside the HVAC housing stays elevated for hours. Bacteria and mildew don't need an invitation — they just need time and dampness, and the sealed cabin gives them both.
This effect is amplified for anyone who parks in a garage overnight, where ambient airflow around the vehicle is already minimal. Even a Tesla CPO purchase — a pre-owned vehicle that may have sat on a lot between owners — can arrive with the early stages of evaporator colonization already underway if the HVAC system wasn't properly dried before storage.
The Heat Pump System and Condensation Behavior
Tesla's heat pump represents one of the more sophisticated thermal management systems in the EV industry. Introduced with the Model Y and later adopted across the lineup — including the Model 3, refreshed Model S, and Model X — the heat pump moves heat rather than generating it, delivering up to 20% less energy consumption during cold-weather travel compared to resistive heating alone. An integrated "octovalve" directs refrigerant and coolant through different loops depending on whether the system is heating, cooling, or managing battery temperature.
This versatility is a strength — until you consider what it means for condensation. A traditional AC-only system has a relatively predictable condensation cycle: the compressor runs, the evaporator gets cold, moisture collects, and the condensation drains. The heat pump, however, can alternate between heating and cooling modes during transitional weather — those 50-to-65-degree days in spring and fall when outdoor temperatures hover between comfortable and slightly cool. You might notice this happening during your drive as the system quietly shifts strategies.
Each mode switch changes the evaporator's surface temperature. Cool it down, and condensation forms. Warm it up briefly during a heating cycle, and some of that moisture partially evaporates — only to recondense when the system swings back to cooling. This erratic condensation pattern keeps the coil surface damp for longer stretches than a simple, steady-state cooling cycle would. It's the thermal equivalent of a surface that never quite dries, which is exactly the environment bacterial colonies love.
The Moisture Barrier Clip and Evaporator Drain Path Issue
This third factor is the least obvious and the most Tesla-specific. Community forums and independent teardown analyses have identified a subtle design detail in the HVAC housing of certain Tesla models: the physical barrier separating the wet evaporator zone from the dry cabin air filter zone may not create a perfectly sealed boundary in all units.
Here's what that means in practical terms. The evaporator coil sits in a section of the HVAC housing where condensation is expected — water collects, drips into a drain pan, and exits through a tube under the vehicle. The cabin air filter sits nearby, upstream in the airflow path, and is supposed to remain dry. Between these two zones, clips and seals are designed to prevent moisture from migrating from the wet side to the dry side.
In some vehicles, however, moisture can wick along surfaces or seep past these barriers through capillary action — the same phenomenon that causes a paper towel to absorb water upward against gravity. When humidity migrates into the filter housing, the filter media itself becomes damp. A wet cabin air filter doesn't just reduce filtration efficiency; it becomes another surface for bacteria and mold to colonize. Suddenly, you're not dealing with one contaminated component — you have two, and every cubic foot of air passing through the system contacts both of them before reaching your face.
This moisture migration issue explains why some Tesla owners replace the cabin air filter and notice the vinegar smell returns within weeks. The new filter gets re-contaminated because the root moisture pathway was never addressed. It also explains why service bulletins related to HVAC odor in certain models have included not just evaporator cleaning but also inspection and adjustment of drainage components and barrier hardware.
Taken together, these three factors — the sealed cabin trapping humidity, the heat pump's erratic condensation cycles, and the potential moisture bridge between wet and dry zones — create a system that's more hospitable to microbial growth than many competing designs. The encouraging part is that each factor has a corresponding countermeasure. Some involve physical maintenance, but one of the most effective defenses is something you can control from your driver's seat: how you manage the balance between recirculated and fresh air flowing through the system.
Recirculation vs Fresh Air Mode and Moisture Dynamics
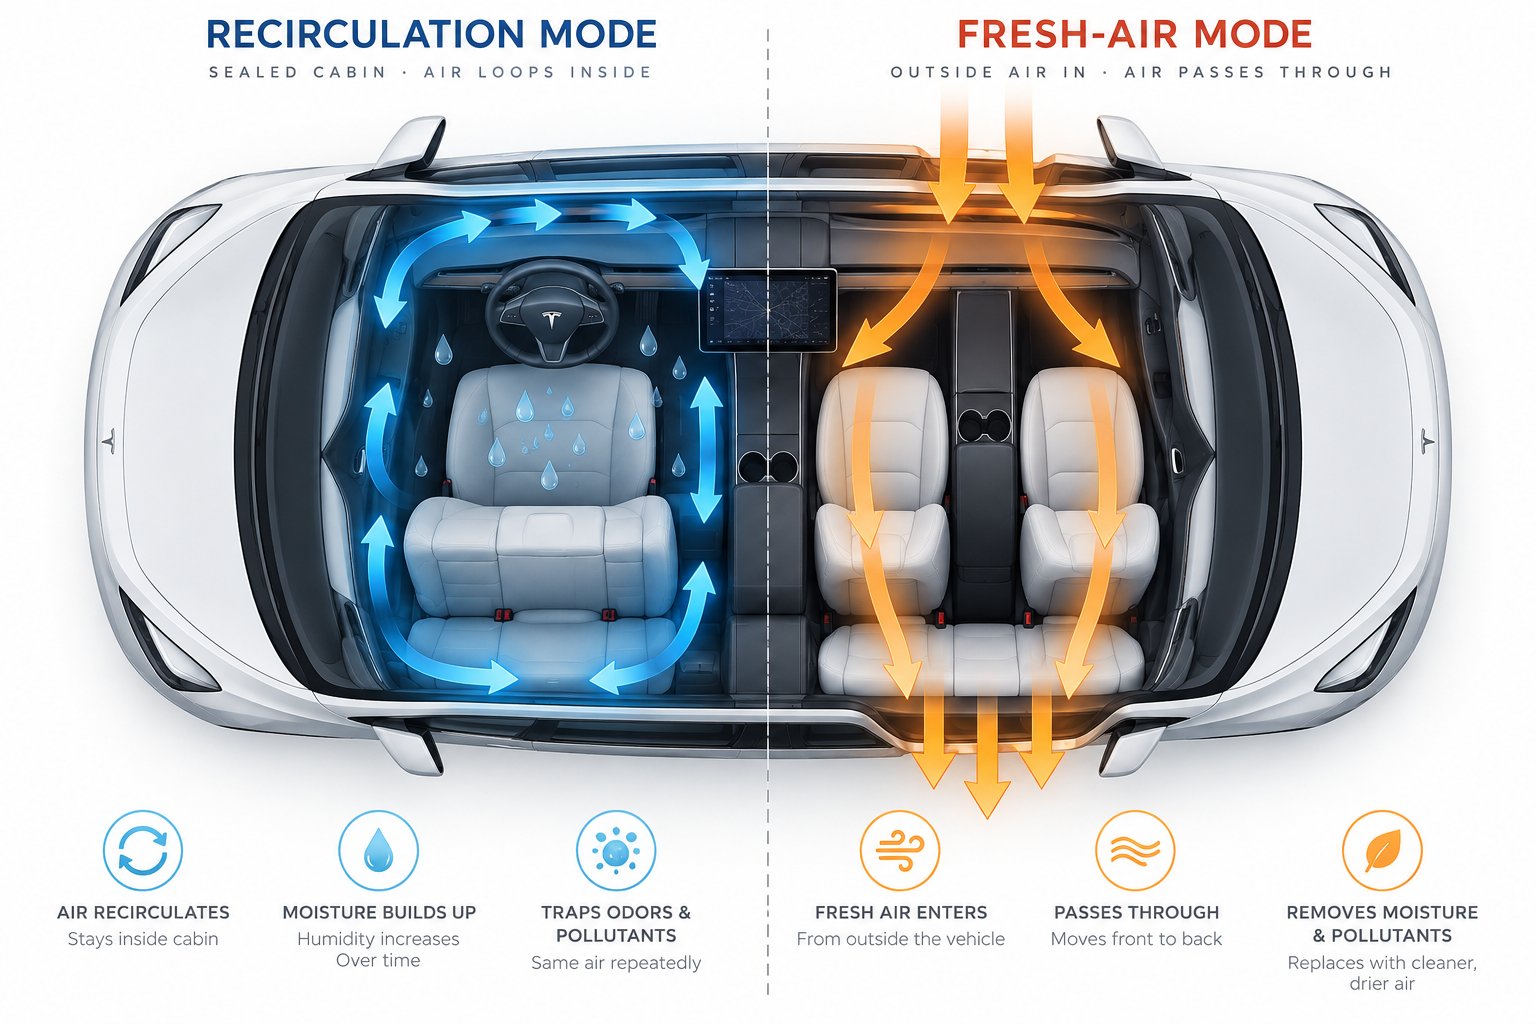
Your Tesla's climate controls offer two fundamental airflow paths — recirculation and fresh air — and the one you choose has a direct impact on how much moisture accumulates on the evaporator coil. Most owners never think about it. They tap the temperature, let the system do its thing, and move on. But this single setting can either accelerate bacterial growth or quietly suppress it, depending on your climate and how you use it.
Recirculation Mode and the Moisture Trap Effect
Recirculation mode closes off the outside air intake and continuously cycles cabin air back through the evaporator. It cools the interior faster because it's re-chilling already cooled air rather than pulling in hot air from outside. It also uses less energy — a meaningful benefit in an EV where every watt affects range.
The downside? In humid climates, the air inside your cabin already carries significant moisture from your breath, clothing, and any damp items on board. Recirculation keeps feeding that humid air across the evaporator coil over and over, generating a steady stream of condensation without ever introducing drier outside air to balance things out. Think of it as running a dehumidifier in a sealed room while someone keeps spraying a mist bottle — the system never catches up. Over time, this persistent moisture load on the coil creates the exact conditions bacteria need to thrive.
Fresh Air Mode and Its Hidden Advantage
Fresh air mode does the opposite: it draws outside air in, passes it through the cabin air filter, cools or heats it, and pushes it into the cabin. In dry or moderate climates, this incoming air carries less moisture than recirculated cabin air, which means less condensation forming on the evaporator and a better chance of residual moisture evaporating between cooling cycles.
Here's the catch, though — fresh air mode isn't universally better. On a sweltering, 90% humidity summer day in Houston or Miami, the outside air is practically saturated. Pulling it through the HVAC system dumps even more moisture onto the coil than recirculated air would. The optimal choice depends entirely on what's happening outside. Dry day? Fresh air is your friend. Tropical downpour? Recirculation may actually keep the coil drier.
Toggling Strategies for Odor Reduction
The real power isn't in picking one mode and sticking with it — it's in switching strategically. The single most effective habit you can build takes less than a minute and costs absolutely nothing.
During the last 3 to 5 minutes of every drive, switch your Tesla to fresh air mode, turn the AC compressor off, and leave the fan running on medium. This pulls ambient air across the evaporator coil and helps evaporate residual condensation before you park — starving bacteria of the standing moisture they need to grow.
This technique works because the fan moves air without adding new condensation. The evaporator, no longer being actively chilled by the compressor, warms toward ambient temperature. That temperature rise accelerates evaporation from the coil surface. By the time you step out, the coil is noticeably drier than it would be if you simply shut the car off with the AC still running at full blast.
For owners in humid regions, pairing this end-of-drive routine with recirculation mode during the main portion of the drive strikes the best balance — efficient cooling while driving, active drying before parking. It won't eliminate a bacterial colony that's already established, but it dramatically slows future growth. And slowing that growth buys you time between deeper maintenance steps — including some Tesla-specific software settings that most owners never think to adjust.
Tesla Software Settings That Make the Smell Worse or Better
The airflow toggle technique from the previous section is something any car owner can do. But Tesla's software stack introduces a layer of climate automation that no other automaker matches — and that automation has unintended consequences for moisture inside the HVAC system. Three features in particular can either help dry your evaporator or quietly keep it damp, depending entirely on how you configure them.
Smart Preconditioning and Scheduled Departure
Imagine walking out to your Tesla on a freezing January morning and finding the cabin already at 72 degrees, the steering wheel warm, and the battery optimized for maximum range. That's the promise of Tesla's Scheduled Precondition and Departure features — and they deliver on it beautifully. The system automatically calculates when to start preconditioning so that the cabin climate and battery are ready by your departure time.
Here's the moisture problem most owners overlook. When preconditioning runs the AC compressor to cool the cabin — common in warm climates — condensation forms on the evaporator coil exactly the way it does during any cooling cycle. But nobody is driving. Nobody is arriving for another 20 or 30 minutes. That moisture sits on the coil surface in a sealed, parked car, giving bacteria a fresh drink of water and a head start before you even open the door.
The fix is simple: schedule your departure time as precisely as possible. If you leave for work at 7:45 AM, set it for 7:45 — not 7:00. Tesla's system is smart enough to back-calculate when preconditioning needs to begin. The shorter the gap between the system finishing its work and you actually driving away, the less idle moisture time the evaporator endures. Every unnecessary minute the car sits post-preconditioning is a minute bacteria spend colonizing a freshly dampened coil.
The same logic applies to Smart Preconditioning, which learns your routine and activates automatically based on your driving patterns. If your schedule is irregular — you drive to the office three days a week but work from home the other two — the system may precondition on mornings you never leave. That means the AC ran, moisture formed, and it sat undisturbed all day. Owners with unpredictable routines may find it cleaner to rely on Scheduled Departure with manual settings rather than letting the predictive algorithm guess.
Cabin Overheat Protection — Help or Hindrance
Tesla's Cabin Overheat Protection activates automatically when interior temperatures climb past a set threshold, keeping the cabin from becoming dangerously hot while the car is parked. It can run for up to 12 hours after you exit or until the battery drops below the Low Power Mode threshold. You'll find the toggle under Controls > Safety on the touchscreen — or remotely through the Tesla app's Climate menu.
Whether this feature helps or hurts the vinegar smell depends almost entirely on where you live.
- Hot, dry climates (Phoenix, Las Vegas, inland California): Cabin Overheat Protection circulates air through the HVAC system in conditions where ambient humidity is low. That airflow can passively help dry the evaporator coil and ductwork — a net positive for odor prevention.
- Hot, humid climates (Houston, Miami, the Gulf Coast): The system may cycle the AC compressor to pull cabin temperature down, generating fresh condensation on the evaporator. Once the target temperature is reached, the compressor stops — and that new moisture sits stagnant until the next activation cycle or your next drive. In these environments, Cabin Overheat Protection can actually accelerate the very bacterial growth responsible for that sour smell.
The solution for humid-region owners is a setting most people scroll right past. Tesla offers three Cabin Overheat Protection modes: Off, No A/C (fan only), and On (with AC). Choosing No A/C keeps the fan circulating air without running the compressor, which means no new condensation forms. You still get meaningful heat reduction — enough to protect interiors and electronics — without turning the evaporator into a bacteria spa. It's one of the most effective yet underused settings for managing why your Tesla develops that persistent vinegar odor.
Leveraging the Tesla App for Odor Prevention
Your phone is a surprisingly powerful tool for evaporator maintenance. The Tesla mobile app lets you remotely activate climate controls from anywhere — and that capability doubles as an on-demand drying system.
Heading to the car in 10 minutes? Open the app, turn on the fan without AC, and let it run. That short burst of airflow ventilates the cabin and pushes ambient air across the evaporator, evaporating any residual condensation from Cabin Overheat Protection cycles or yesterday's drive. By the time you reach the driver's seat, the system has already flushed stale, bacteria-laden air out of the HVAC housing.
This is especially useful after your Tesla has been parked for a full day or longer — say, at an airport lot during a weekend trip. A two-minute remote fan activation before you walk to the car can eliminate that concentrated "first blast" of sour air that would otherwise hit you the instant the vents activate. It's proactive rather than reactive, and it costs only a trivial amount of battery energy.
Software settings alone won't fix an evaporator that's already heavily colonized. But they control the environmental conditions that allow colonies to form in the first place. Dial in the right configuration — precise departure scheduling, fan-only overheat protection in humid climates, and occasional remote ventilation — and you've removed most of the moisture that bacteria depend on. The remaining question is whether these strategies work equally well across Tesla's entire lineup, or whether certain models face unique challenges that demand different approaches.
Which Tesla Models Are Most Affected
The software strategies covered above apply across every Tesla, but the hardware underneath varies more than most owners realize. Each model uses a different HVAC layout, a different filter access design, and — in some cases — a fundamentally different thermal management architecture. Those differences directly affect how likely the vinegar smell is to develop, how easy it is to fix, and which specific service bulletins or community-documented solutions apply to your vehicle.
Here's a model-by-model breakdown so you can zero in on exactly what your Tesla needs.
Model 3 and Model Y — The Most Affected
If you're reading this article, there's a strong statistical chance you own one of these two vehicles. The Model 3 and Model Y share a nearly identical HVAC platform — the same evaporator coil design, the same cabin air filter housing, and the same airflow path from the fresh air intake beneath the windshield cowl to the dashboard vents. That shared architecture means solutions developed for one model almost always transfer directly to the other.
It also means they share the same vulnerabilities. The moisture barrier issue discussed earlier — where condensation wicks from the evaporator drain zone into the cabin air filter housing — has been most extensively documented on these two models. Community testing, including teardown work by independent engineers, has confirmed that water can travel through the fan housing and saturate the lower cabin air filter, especially during rain or car washes when the fan is running at higher speeds.
Tesla's own response reinforces the pattern. Service bulletins specifically targeting HVAC odor complaints have been associated primarily with the Model 3 and Model Y platform. These bulletins have included professional evaporator cleaning, updated drainage components, and in some persistent cases, replacement of refrigerant pressure and temperature sensors tied to broader AC performance issues that contributed to abnormal condensation behavior.
The silver lining? Filter replacement on these models is genuinely straightforward. The two cabin air filters sit behind the glove box, accessible after removing a small panel and a few clips — no specialized tools beyond a T20 Torx driver, and the whole job takes 15 to 30 minutes. That easy access encourages more frequent maintenance, which is the single best defense against recurring odors.
Model S and Model X — Older Architecture Differences
Pre-refresh Model S (2012-2020) and Model X (2015-2020) vehicles use a fundamentally different HVAC layout. These models feature dual-zone climate control with separate evaporator access points, and the cabin air filter location and replacement process differs significantly from the 3/Y platform. On earlier Model S units, reaching the filters often requires removing additional trim panels and navigating a more cramped housing, turning what's a 20-minute job on a Model 3 into a potentially hour-long project.
The vinegar smell absolutely can and does occur on these vehicles — the underlying biology hasn't changed. Bacteria still colonize wet evaporator coils regardless of which Tesla badge sits on the trunk. However, the older resistive heating system in pre-heat-pump Model S and X vehicles may actually offer a slight advantage: resistive heaters generate significantly more direct heat than a heat pump during heating cycles, which can more aggressively dry the evaporator coil as a side effect. Some owners have speculated that this is why odor complaints were somewhat less frequent on older Model S units compared to heat-pump-equipped vehicles, though no controlled study has confirmed the theory.
Post-refresh Model S (2021+) and Model X (2021+) shifted toward the same heat pump architecture used in the Model 3 and Y. As a result, these newer versions are more likely to exhibit the same condensation dynamics — and the same vinegar smell pattern — as their smaller siblings. If you own a refreshed Model S or X, the troubleshooting path and software settings described throughout this article apply more directly to your vehicle than they would to a pre-2021 model.
Cybertruck — Early Reports and Unique Factors
The Cybertruck introduces variables that don't exist in any other Tesla. Its cabin volume is substantially larger than a Model Y's, which means the HVAC system moves more air to maintain target temperatures. A larger airflow volume can translate to more moisture passing over the evaporator per cooling cycle — but it also means more air is available to dry the coil when the compressor shuts off. The net effect on bacterial growth is still unclear, and early owner reports are mixed.
What is clear is that the Cybertruck's distinct HVAC system and unique cabin geometry mean filter access, evaporator location, and drainage paths don't mirror the Model 3/Y platform. Owners shouldn't assume that aftermarket solutions designed for the 3/Y — like specific moisture barrier clips — will fit the Cybertruck without modification. The core maintenance principles, however, remain universal: keep the evaporator dry, replace filters on schedule, and use the fan-only drying technique before parking.
For a quick comparison across the full lineup, here's a summary of what each model brings to the table:
| Model | HVAC Type | Filter Access Difficulty | Common Odor Reports |
|---|---|---|---|
| Model 3 | Heat pump (2021+); AC-only with resistive heat (earlier builds) | Easy — behind glove box, 15-30 min DIY | Very common; most-documented model for vinegar smell and moisture barrier issues |
| Model Y | Heat pump (all model years) | Easy — same housing and process as Model 3 | Very common; shares HVAC platform with Model 3, identical odor patterns |
| Model S (Pre-2021) | AC compressor with resistive heating | Moderate — more trim removal, dual-zone layout | Less frequent; resistive heat may help dry evaporator more aggressively |
| Model S (2021+) | Heat pump | Moderate — improved but still more involved than 3/Y | Increasing reports as heat pump architecture mirrors Model 3/Y dynamics |
| Model X (Pre-2021) | AC compressor with resistive heating | Moderate to difficult — unique access angles due to cabin design | Less frequent; similar pattern to pre-refresh Model S |
| Model X (2021+) | Heat pump | Moderate — closer to refreshed Model S process | Emerging reports consistent with other heat pump models |
| Cybertruck | Heat pump with high-volume cabin HVAC | TBD — limited aftermarket documentation so far | Early and mixed; larger cabin volume creates different moisture dynamics |
Regardless of which row your Tesla falls into, the underlying cause is the same: moisture on the evaporator feeding bacterial colonies that produce acetic acid. The model-specific differences affect how easily you can access the filters and how aggressively the system retains moisture — but they don't change the fix. What does change is how far you need to escalate your approach, from free airflow tricks to filter replacement to a full professional service visit. That escalation path is where the real decision-making begins.
Fixing the Smell from Quick Wins to Professional Solutions
You know what's causing the vinegar smell, which models are most vulnerable, and which software settings make it worse. The only question left is what to actually do about it. The answer isn't one-size-fits-all — it depends on how severe the odor is, how long it's been building, and how comfortable you are working in the passenger footwell with a Torx driver.
The solutions below are organized into three escalating levels. Start at Level One. If the smell persists after a week of consistent effort, move to Level Two. Reserve Level Three for cases where DIY approaches haven't resolved the problem or where you suspect deeper issues like a clogged condensate drain.
Level One — Free Immediate Fixes
These cost nothing, take no tools, and can reduce mild odors starting today. They won't eliminate an established bacterial colony, but they slow its growth and can meaningfully improve cabin air quality within a few drives.
- Flush the system with maximum cold air and open windows. Park somewhere safe, roll all four windows down, crank the AC to its coldest setting, and set the fan to maximum. Let it run for 10 to 15 minutes. This pushes the concentrated pocket of stale, bacteria-laden air out of the HVAC housing and through the cabin instead of letting it linger. The open windows ensure those volatile organic compounds exit the car entirely rather than recirculating.
- Adopt the end-of-drive drying habit. During the last 3 to 5 minutes of every trip, switch to fresh air mode, turn the AC compressor off, and leave the fan running at medium speed. This draws ambient air across the evaporator coil and evaporates residual condensation before you park. It's the single most effective free strategy for long-term odor prevention.
- Toggle fresh air mode during drives. If you've been running in recirculation mode exclusively, periodically switch to fresh air — especially on dry days. Introducing lower-humidity outside air helps balance the moisture load on the evaporator.
Estimated time: 15 minutes for the initial flush; 3 to 5 minutes per drive for the drying habit.
Difficulty: None — all controls are on the touchscreen.
Best for: Faint or intermittent sour odors that appeared recently.
Level Two — DIY Cabin Filter Replacement and Evaporator Cleaning
If the free fixes haven't knocked the smell out within a week or two, the bacterial colony is likely too well established to address with airflow alone. This is where the single most impactful DIY maintenance step comes in: replacing your cabin air filters and cleaning the evaporator coil.
A saturated or contaminated filter acts as a secondary breeding ground. Even if the evaporator is the primary source, a damp filter loaded with dust and organic debris holds moisture and bacterial colonies that continuously re-contaminate every breath of air passing through the system. Swapping it out removes that reservoir entirely.
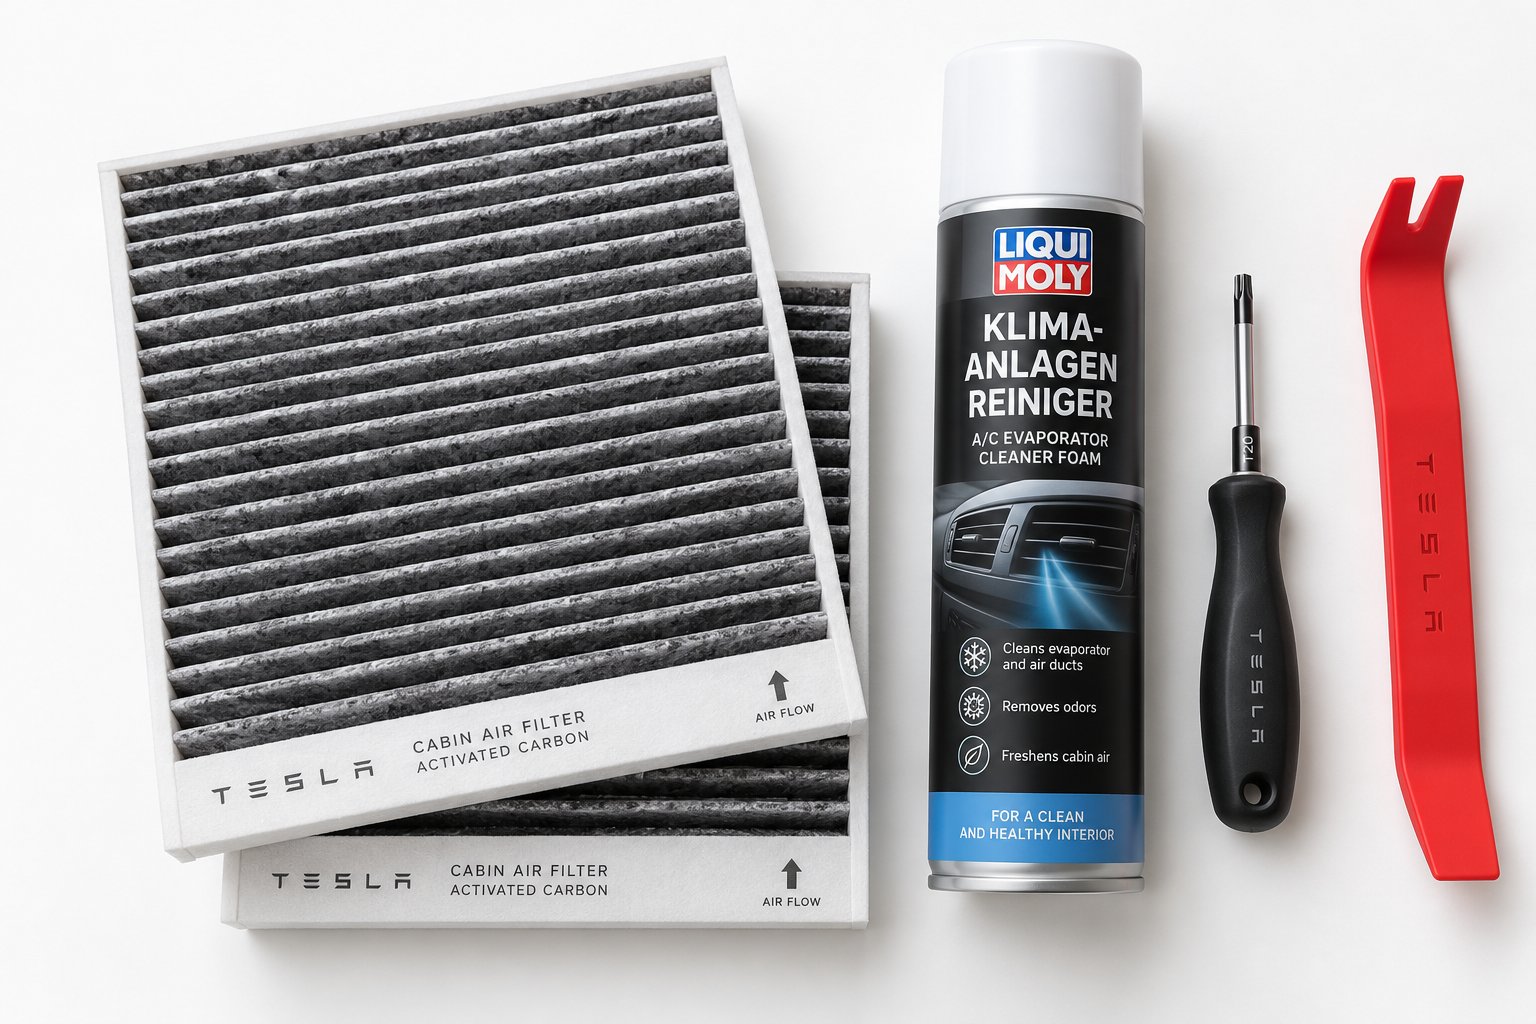
On the Model 3 and Model Y, the process is straightforward. Tesla's official DIY guide walks through it: slide the passenger seat back, pop the footwell cover off with a trim tool, disconnect two electrical connectors, remove the side panel from the center console, unscrew the T20 fastener on the filter cover, and pull both filters out by their tabs. The whole teardown takes 15 to 20 minutes with no specialized equipment.
When choosing replacement filters, consider upgrading beyond the standard OEM option. A filter with an activated carbon layer specifically adsorbs volatile organic compounds — including acetic acid, the exact compound responsible for that vinegar smell. CUTIM's High-Efficiency HEPA and Activated Carbon Air Filter for Model 3 and Y combines HEPA-grade particulate filtration with a dedicated activated carbon layer, making it a directly relevant upgrade for owners dealing with persistent sour HVAC odors. The carbon doesn't just trap particles — it chemically adsorbs the odor-causing VOCs that a standard filter lets pass right through.
With the filters removed, you have direct access to the evaporator coil. This is the ideal time to apply a foaming evaporator cleaner. Spray the foam across the exposed coil surface through the filter housing opening, let it sit for 10 to 15 minutes to penetrate the biofilm, and allow it to drain out through the condensate line. No rinsing is needed. Then install the new filters — airflow arrows pointing toward the rear of the vehicle — and reassemble in reverse order. The complete process including foam soak time runs about 30 to 45 minutes.
Estimated time: 30 to 45 minutes.
Difficulty: Easy to moderate — basic trim removal and one T20 screw.
Best for: Established vinegar smell that persists through multiple drives despite Level One measures.
Level Three — Tesla Service Center and the Service Bulletin
Sometimes the DIY route isn't enough. If you've replaced the filters, cleaned the evaporator, adopted the drying habit, and the sour smell still returns within a few weeks, the issue likely runs deeper than surface-level bacterial growth. A clogged or partially obstructed condensate drain can keep the evaporator housing perpetually wet, and no amount of foam cleaner fixes a drain that won't drain.
Tesla Service Centers can perform a comprehensive HVAC inspection that goes beyond what's accessible from the passenger footwell. This includes professional-grade evaporator cleaning with commercial equipment, inspection of the condensate drain line for blockages, and evaluation of the moisture drainage path and barrier hardware between the wet evaporator zone and the dry filter housing.
Critically, Tesla has issued service bulletins related to persistent HVAC odor on certain Model 3 and Model Y vehicles. These bulletins have involved not just evaporator treatment but also replacement of refrigerant pressure and temperature sensors and, in some cases, refrigerant line repairs tied to abnormal condensation behavior. If your vehicle falls under an applicable bulletin, portions of the work may be handled under warranty — it's worth asking when you schedule the appointment through the Tesla app.
Estimated time: Typically a half-day to full-day service appointment.
Difficulty: None for the owner — Tesla technicians handle everything.
Best for: Persistent odor that returns quickly after proper DIY cleaning, suspected drain blockages, or accompanying symptoms like hissing noises or intermittent loss of AC cooling.
Here's a quick-reference summary of all three levels:
| Fix Level | What It Involves | Time Required | Difficulty | Effectiveness |
|---|---|---|---|---|
| Level 1: Free Fixes | AC flush with windows open, fan-only drying habit, fresh air toggling | 15 min initial + 3-5 min per drive | None | Good for mild, recent odors |
| Level 2: DIY Filter + Coil Clean | Cabin air filter replacement (ideally with activated carbon upgrade) and foaming evaporator cleaner | 30-45 minutes | Easy to moderate | Resolves most established odors |
| Level 3: Tesla Service Center | Professional evaporator cleaning, drain inspection, potential service bulletin work | Half-day to full-day appointment | None (handled by technicians) | Required for persistent or recurring cases |
Most owners find the smell eliminated at Level Two — a fresh set of activated carbon filters paired with a thorough coil cleaning handles the vast majority of cases. The natural follow-up question is what all of this costs, from the price of a replacement filter set to the bill at a Tesla Service Center, so you can weigh your options with real numbers in front of you.
How Much It Costs to Eliminate the Vinegar Smell
Knowing the three-level fix framework is one thing. Knowing what each level actually costs — in dollars, not just effort — is what turns a plan into a decision. The price gap between a DIY filter swap and a full Tesla Service Center visit is significant enough that it's worth laying out the numbers before you commit to a path.
DIY Costs — Filter and Cleaning Supplies
A cabin air filter replacement ranks among the most affordable maintenance items on any Tesla. OEM filters purchased directly from Tesla typically run in the $30 to $60 range for a set, depending on the model. Aftermarket options vary — basic particulate-only filters often cost less, while upgraded HEPA and activated carbon filters can land in a similar or slightly higher bracket depending on filtration quality and brand. The price difference between a basic filter and one with an activated carbon layer is usually modest, and for owners specifically chasing that sour HVAC smell, the carbon upgrade pays for itself by actively adsorbing the acetic acid compounds that standard filters ignore.
Evaporator coil cleaning spray adds another $10 to $25 per can, and a single can is typically enough for one thorough treatment. If you don't already own a T20 Torx driver and a basic trim removal tool, expect to spend under $15 for both — tools you'll reuse on every future filter change.
All in, the complete DIY approach — replacement filters plus evaporator cleaner plus any tools you need to buy — generally lands well under $100. Compare that to a service center visit, and you'll see why most owners start here.
Tesla Service Center Costs for HVAC Odor Treatment
A professional HVAC odor diagnosis and evaporator cleaning at a Tesla Service Center can vary significantly based on your region, the scope of work, and whether a service bulletin applies to your vehicle. Independent EV shops sometimes offer the same service at a lower labor rate, though availability depends on your area.
Standard service visits for odor complaints typically involve labor charges that dwarf the cost of the parts themselves. Filter replacement performed by Tesla is more expensive than doing it at home, primarily because of the labor rate — the filters are the same, but you're paying a technician to install them. When the scope expands to include professional evaporator cleaning with commercial-grade equipment, condensate drain inspection, or hardware adjustments related to the moisture drainage path, the total can climb considerably.
If your Model 3 or Model Y falls under one of the service bulletins related to persistent HVAC odor — which have included evaporator treatment, sensor replacement, and refrigerant line work — some or all of the cost may be covered differently. It's worth asking explicitly when you schedule. The easiest way to get a clear estimate is to request a quote through the Tesla app before confirming your appointment. Describe the symptom (sour or vinegar-like smell from AC vents), mention any DIY steps you've already taken, and ask whether any applicable service bulletins cover your VIN.
When Professional Service Is Worth the Investment
Not every case of vinegar smell justifies a service center visit. But certain scenarios make the investment clearly worthwhile:
- Persistent odor after multiple filter changes: If you've replaced the cabin air filters twice within a few months and the smell returns each time within weeks, the issue likely involves a clogged condensate drain or compromised moisture barrier that DIY methods can't reach.
- Suspected mold deep in the HVAC ductwork: A musty undertone layered beneath the vinegar smell — especially one that doesn't improve after an evaporator foam treatment — suggests mold has colonized surfaces beyond the coil itself. Professional disassembly and cleaning is the only reliable fix.
- Visible moisture intrusion: Water pooling in the passenger footwell, damp carpet beneath the glove box, or a cabin air filter that's soaking wet immediately after installation all point to a drainage problem that requires hands-on diagnosis.
- Accompanying AC performance issues: Hissing sounds from the dashboard, intermittent loss of cooling, or unusual compressor cycling patterns alongside the smell may indicate a refrigerant issue that overlaps with the odor complaint — and those require professional equipment to diagnose.
Think of it this way: the DIY path handles the biology. Professional service handles the plumbing and engineering. If fresh filters and a clean coil keep the smell away for months, you never need Level Three. If the smell keeps coming back despite doing everything right, something structural is feeding the cycle — and that's where a technician's access and diagnostic tools earn their cost.
| Approach | Estimated Cost Range | Difficulty | Effectiveness for Mild Odor | Effectiveness for Severe Odor |
|---|---|---|---|---|
| DIY Filter Replacement Only | $30 – $75 (filters + tools if needed) | Easy — 15 to 30 min | High — often resolves mild, recent odors entirely | Moderate — may reduce but not eliminate established colonies |
| DIY Filter + Evaporator Spray | $50 – $100 (filters, foam cleaner, tools) | Easy to moderate — 30 to 45 min | Very high — comprehensive first-line treatment | High — resolves most established cases |
| Tesla Service Center Visit | $150 – $500+ (varies by region and scope; potentially covered under service bulletin) | None — handled by technicians | Complete — professional-grade treatment | Complete — includes drain and hardware inspection unavailable to DIY |
For the majority of owners, the middle column — a quality set of activated carbon filters plus a foaming coil cleaner — eliminates the problem for well under $100 and less than an hour of effort. That combination handles the bacterial source on the evaporator and the secondary contamination on the filter media in a single session. The service center route is the insurance policy for when biology alone isn't the whole story.
Spending money once to fix the smell is satisfying. Spending money repeatedly because it keeps returning is not. The real cost savings come from preventing the problem from cycling back — and that requires a maintenance rhythm tailored to your climate, your driving habits, and your Tesla's specific needs.

How to Prevent the Vinegar Smell from Coming Back
Eliminating the sour odor once feels like a win. Eliminating it permanently? That's the actual goal. The difference between a one-time fix and a lasting solution comes down to habits — small, repeatable actions that keep the evaporator coil dry, the cabin air filter fresh, and the HVAC housing hostile to bacterial recolonization. None of this is complicated, but it does require consistency. Think of it less like a repair and more like brushing your teeth: the individual effort is trivial, but skipping it for weeks creates problems that are much harder to reverse.
Driving Habits That Keep the Evaporator Dry
Moisture is the single resource bacteria cannot survive without. Remove it from the evaporator coil, and you've cut off their supply line — no matter how sealed the cabin is or how often the heat pump cycles between modes. Three driving habits make the biggest difference, and all of them are free.
The end-of-drive drying technique deserves its own permanent spot in your routine. During the last 3 to 5 minutes of every trip — whether it's a 10-minute grocery run or a 3-hour road trip — switch to fresh air mode, turn the AC compressor off, and leave the fan running at medium speed. The evaporator warms toward ambient temperature, residual condensation evaporates, and by the time you park, the coil surface is noticeably drier than it would be if you simply shut everything off mid-cooling cycle. This one habit alone can delay bacterial regrowth by weeks.
Periodic fresh air cycling during longer drives adds another layer of defense. If you typically run in recirculation mode for efficiency — which is perfectly reasonable — flip to fresh air for five to ten minutes every hour or so, especially on dry days. That brief window introduces lower-humidity outside air that helps balance the moisture load on the evaporator. In humid climates where outside air is already saturated, this is less beneficial, but in moderate or dry conditions, it's a meaningful moisture reduction strategy.
Avoid the sealed-and-damp parking scenario. If you've just finished a drive with the AC running hard on a humid summer afternoon, the evaporator is soaking wet. Parking immediately with all windows sealed traps that moisture in an airtight space for hours — exactly the environment bacteria thrive in. Whenever practical, crack a window for a few minutes before locking up, or run the fan-only drying technique described above. Even leaving a window slightly open in a secure garage overnight allows passive airflow that accelerates evaporation inside the HVAC housing.
Optimal Filter Replacement Schedule
A cabin air filter that's past its useful life doesn't just reduce airflow — it becomes a secondary incubation chamber. Dust, pollen, and organic debris trapped in the filter media absorb moisture from the evaporator zone, creating a damp mat of material that bacteria and mold colonize independently from the coil itself. Even a freshly cleaned evaporator can't keep the cabin smelling clean if the air passes through a contaminated filter on its way to the vents.
Tesla's official maintenance guidelines recommend replacing the cabin air filter every 2 years for Model 3 and Model Y, and every 3 years for Model S and Model X. Cybertruck is not fitted with a standard cabin air filter, though HEPA-equipped Cybertrucks should have the HEPA filter replaced every 2 years — or annually if you're regularly driving on dirt roads or off-pavement surfaces. These intervals assume average driving conditions, which is where most owners should start.
But "average" doesn't account for every situation. If you live in a humid subtropical climate — think the Gulf Coast, Southeast, or mid-Atlantic summers — moisture exposure on the filter is significantly higher, and bacterial contamination can set in well before the two-year mark. The same is true for owners in high-pollen regions, where the filter loads up with organic material faster, or areas with heavy wildfire smoke seasons that can saturate a filter in weeks rather than months. In these environments, checking the filter every 12 months and replacing it at the first sign of discoloration, dampness, or odor is a smarter cadence.
When replacement time arrives, the filter you choose matters just as much as the timing. A standard particulate filter catches dust and pollen but does nothing to neutralize the volatile organic compounds — like acetic acid — that actually cause the vinegar smell. Upgrading to a filter with an activated carbon layer adds a chemical adsorption mechanism that traps those odor-causing molecules between replacements, functioning as a continuous, passive defense rather than just a reactive swap. CUTIM's High-Efficiency HEPA and Activated Carbon Air Filter for Tesla Model 3 and Y is purpose-built for this role — the HEPA layer handles particulates while the dedicated carbon layer adsorbs VOCs throughout its service life, keeping the cabin smelling clean even as the evaporator goes through its normal condensation cycles. It's a proactive investment that works quietly in the background between maintenance sessions, rather than something you only think about once the smell has already returned.
Leveraging Tesla's Built-In Features for Prevention
Your Tesla's software is either working for you or against you on the moisture front — and the difference comes down to a few deliberate configuration choices. The key settings covered earlier in this article deserve a structured recap here, because they form an integrated prevention system when used together.
Cabin Overheat Protection should be set to No A/C (fan only) if you park regularly in humid environments. This keeps air circulating without running the compressor, which means no fresh condensation forms on the evaporator while the car sits. In dry, hot climates like Arizona or inland California, leaving the full AC option enabled is less of a concern since the ambient humidity is low enough that any condensation evaporates quickly.
Scheduled Departure should match your actual leave time as closely as possible. If the system preconditions the cabin at 7:00 AM but you don't walk to the car until 7:30, that's 30 minutes of post-preconditioning moisture sitting on the evaporator in a sealed vehicle. Tighten that gap to 5 minutes and you've eliminated the idle moisture window almost entirely. For owners with unpredictable schedules, disabling Smart Preconditioning and relying on manual or app-triggered climate activation is the cleaner approach.
Remote climate activation via the Tesla app is your on-demand drying tool. Heading to the car after it's been parked all day at the office or an airport lot? Open the app 5 to 10 minutes before arrival, turn on the fan without AC, and let it push ambient air across the evaporator. By the time you reach the driver's seat, the concentrated "first blast" of stale bacterial byproducts has already been flushed out. It costs a negligible amount of battery and saves your nose from that initial sour wave.
Stacking these settings together — fan-only overheat protection, precise departure timing, and occasional remote ventilation — creates a layered moisture management strategy that runs largely on autopilot. Pair it with the driving habits and filter schedule above, and you've addressed every major pathway through which bacteria reclaim the evaporator coil.
Here's a consolidated checklist you can bookmark or screenshot as an ongoing reference:
- Last 3-5 minutes of every drive: Switch to fresh air mode, turn AC compressor off, leave fan on medium to dry the evaporator before parking.
- Periodically during drives: Toggle from recirculation to fresh air mode for 5-10 minutes on dry days to reduce evaporator moisture load.
- Cabin Overheat Protection: Set to "No A/C" (fan only) in humid climates; full AC is acceptable in dry, hot regions.
- Scheduled Departure: Set to your exact departure time — minimize the gap between preconditioning completion and when you actually drive.
- Smart Preconditioning: Disable if your schedule is irregular to prevent unnecessary moisture-generating HVAC cycles on days you don't drive.
- Tesla app remote climate: Activate fan-only mode 5-10 minutes before reaching a parked car to flush stale HVAC air and dry the coil.
- Cabin air filter replacement: Every 2 years for Model 3/Y, every 3 years for Model S/X per Tesla's official schedule — or every 12 months in humid, high-pollen, or smoke-prone environments.
- Filter upgrade: Choose an activated carbon filter (such as CUTIM's HEPA and activated carbon option) to continuously adsorb odor-causing VOCs between replacements.
- Evaporator coil cleaning: Apply foaming coil cleaner at every filter change or whenever the sour smell begins to return.
- Garage ventilation: If you park in a garage, crack a window occasionally or use a small fan to encourage passive airflow around the vehicle.
Most Tesla owners who follow this checklist consistently find the vinegar smell becomes a solved problem rather than a recurring frustration. The fixes themselves are straightforward. The real secret is building them into a rhythm — a few minutes at the end of each drive, a quick settings audit after any major software update, and a filter swap at regular intervals. Your Tesla's HVAC system wasn't designed to smell bad. It just needs a little help staying dry.
Frequently Asked Questions About Tesla Vinegar Smell
1. Is a vinegar smell in my Tesla dangerous or a sign of battery failure?
No, a vinegar-like odor from your Tesla's vents is not a safety hazard and has nothing to do with the high-voltage battery, electric motor, or drivetrain. It is caused by bacteria — primarily Mycobacterium and Pseudomonas species — colonizing the wet evaporator coil inside the HVAC system. These organisms produce acetic acid as a metabolic byproduct, which is the same compound found in household vinegar. The only smell that might indicate a battery-related issue is a rotten-egg or sulfur odor, which can point to a failing 12V lead-acid auxiliary battery in certain Tesla models and should be inspected separately.
2. Why does my Tesla AC smell worse when I first turn it on?
When your Tesla sits parked, bacteria on the damp evaporator coil continue producing volatile organic compounds like acetic acid. These sour vapors accumulate in the stagnant air trapped inside the sealed HVAC housing. The moment you activate climate control, the blower fan pushes that concentrated pocket of bacterial byproducts directly into the cabin in one initial burst. As steady airflow establishes over the next few minutes, it dilutes the accumulated VOCs and begins drying the coil surface, which is why the odor typically fades after 10 to 30 seconds. A strong first-blast that fades quickly suggests a moderate colony, while a persistent smell throughout the drive points to heavier biofilm buildup requiring more aggressive cleaning.
3. How do I get rid of the vinegar smell in my Tesla without going to a service center?
Start with free fixes: run the AC on maximum cold with all windows open for 10-15 minutes to flush stale air, then adopt a habit of switching to fresh air mode with the AC compressor off and fan on medium during the last 3-5 minutes of every drive to dry the evaporator. If the smell persists, replace the cabin air filters — ideally upgrading to an activated carbon option like CUTIM's HEPA and Activated Carbon Air Filter for Model 3 and Y, which chemically adsorbs acetic acid and other odor-causing VOCs. While the filters are out, spray a foaming evaporator cleaner onto the coil through the filter housing. This two-step DIY process takes about 30-45 minutes and resolves the majority of established odor cases for well under $100.
4. Which Tesla models are most prone to the vinegar HVAC smell?
The Model 3 and Model Y are by far the most commonly affected because they share a nearly identical HVAC platform, including the same evaporator coil design, cabin air filter housing, and a documented moisture barrier issue where condensation can wick from the evaporator drain zone into the filter housing. Tesla service bulletins targeting persistent HVAC odor have been primarily associated with these two models. Post-2021 refreshed Model S and Model X vehicles adopted the same heat pump architecture and are showing increasing odor reports. Pre-refresh Model S and X used resistive heating, which may have dried the evaporator more aggressively as a side effect. Cybertruck data is still limited, though its larger cabin volume introduces different moisture dynamics.
5. Can Tesla software settings help prevent the vinegar smell from coming back?
Yes — three Tesla software features directly influence evaporator moisture. First, set Cabin Overheat Protection to 'No A/C' (fan only) in humid climates so the system circulates air without creating new condensation. Second, configure Scheduled Departure to match your exact leave time, minimizing the gap between preconditioning completion and driving so moisture does not sit idle on the coil. Third, use the Tesla mobile app to remotely activate fan-only climate 5-10 minutes before reaching your parked car, flushing stale bacterial byproducts from the HVAC housing before you open the door. Combined with a regular filter replacement schedule and the end-of-drive drying habit, these settings form a layered prevention system that keeps the evaporator hostile to bacterial recolonization.